最近对公司的一个项目进行了 webpack4 的升级,这边简要概述下对 webpack4 的理解和总结。
升级依赖包
首先需要升级一些依赖包1
2
3
4
5
6
7
8
9
10webpack 升级到 4.x
webpack-cli 升级到 3.x
webpack-dev-server 升级到 3.x
url-loader 升级到 1.x
file-loader 升级到 3.x
happypack 升级到 5.x
postcss-loader 升级到 3.x
less 升级到 2.x
less-loader 升级到 3.x
css-loader 升级到 2.x
新特性与使用
- 已经配置了初始化的一些配置,比如入口文件默认为 ‘./src’
- 新增了构建模式的 mode,开发环境使用 development,生产环境使用 production
- 新增 WebAssembly 构建支持
- 使用 ES6 语法,比如 Map, Set, includes
- CommonsChunk 和 uglify 配置简化,使用 optimization 来进行配置
1
2
3
4
5
6
7
8
9
10
11
12
13
14
15
16
17
18
19
20
21
22
23
24
25
26
27optimization: {
minimize: true, // 是否开启 uglify
splitChunks: {
chunks: 'async', // 要优化的 chunk,Function | String
minSize: 30000, // 新 chunk 的最小体积, Number
maxSize: 0, // 如果 chunkSize 大于该值,split it。与 minSize 冲突
minChunks: 2, // 至少复用此处才会 split
maxAsyncRequests: 5, // 异步模块,一次最多只能被加载5个
maxInitialRequests: 3, // 入口模块最多只能加载3个
automaticNameDelimiter: '~', // vendors~chunk1~...chunkN.js
name: true, // Boolean | Function | String
cacheGroups: {
default: {
minChunks: 2,
// 下面四个是 cacheGroups 特有的
priority: -20, // split 的优先级
reuseExistingChunk: true, // 是否重用 chunk
test: /[\\/]node_modules[\\/]/, // 匹配规则,Function | RegExp | String
enforce: true // 不继承外层的几个属性,用更强制的默认值代替
},
vendors: {
test: /[\\/]node_modules[\\/]/,
priority: -10
}
}
},
},
插件
- mini-css-extract-plugin: webpack4 使用该插件抽出样式文件,取代袁磊的
extract-text-webpack-plugin插件 - optimize-css-assets-webpack-plugin: 用来压缩 css 代码
- progress-bar-webpack-plugin: 用来显示打包的进度和最后打包的时间
分析打包结果
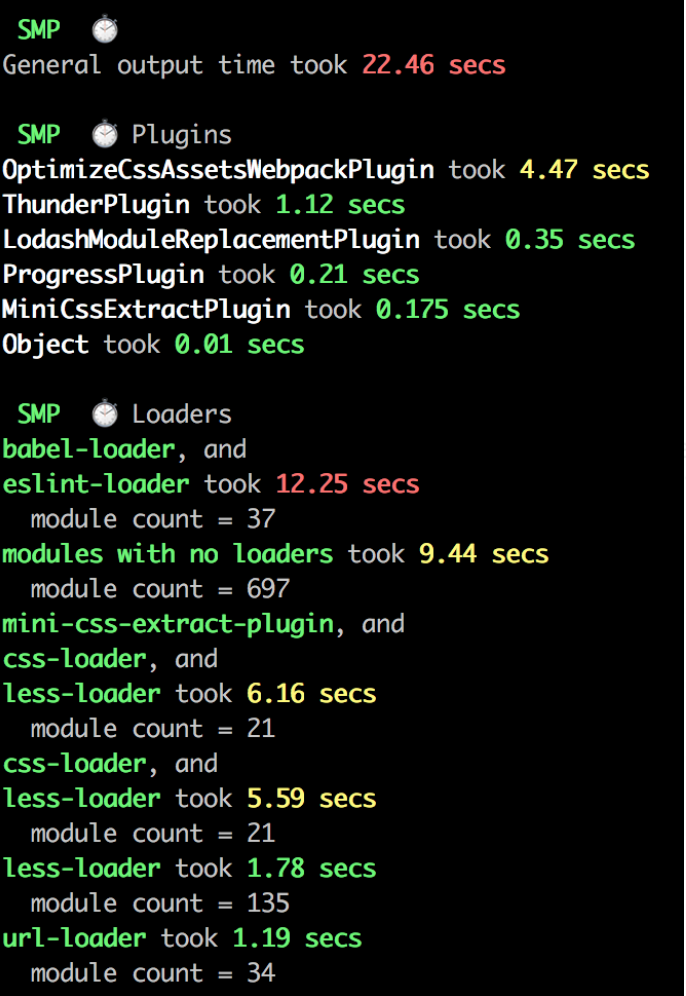
使用 speed-measure-webpack-plugin 插件分析构建速度1
2
3
4const SpeedMeasurePlugin = require('speed-measure-webpack-plugin');
const config = require('./webpack.dev.config.js'); // 更换配置文件达到分析不同环境的打包时间
const smp = new SpeedMeasurePlugin();
module.exports = smp.wrap(config);

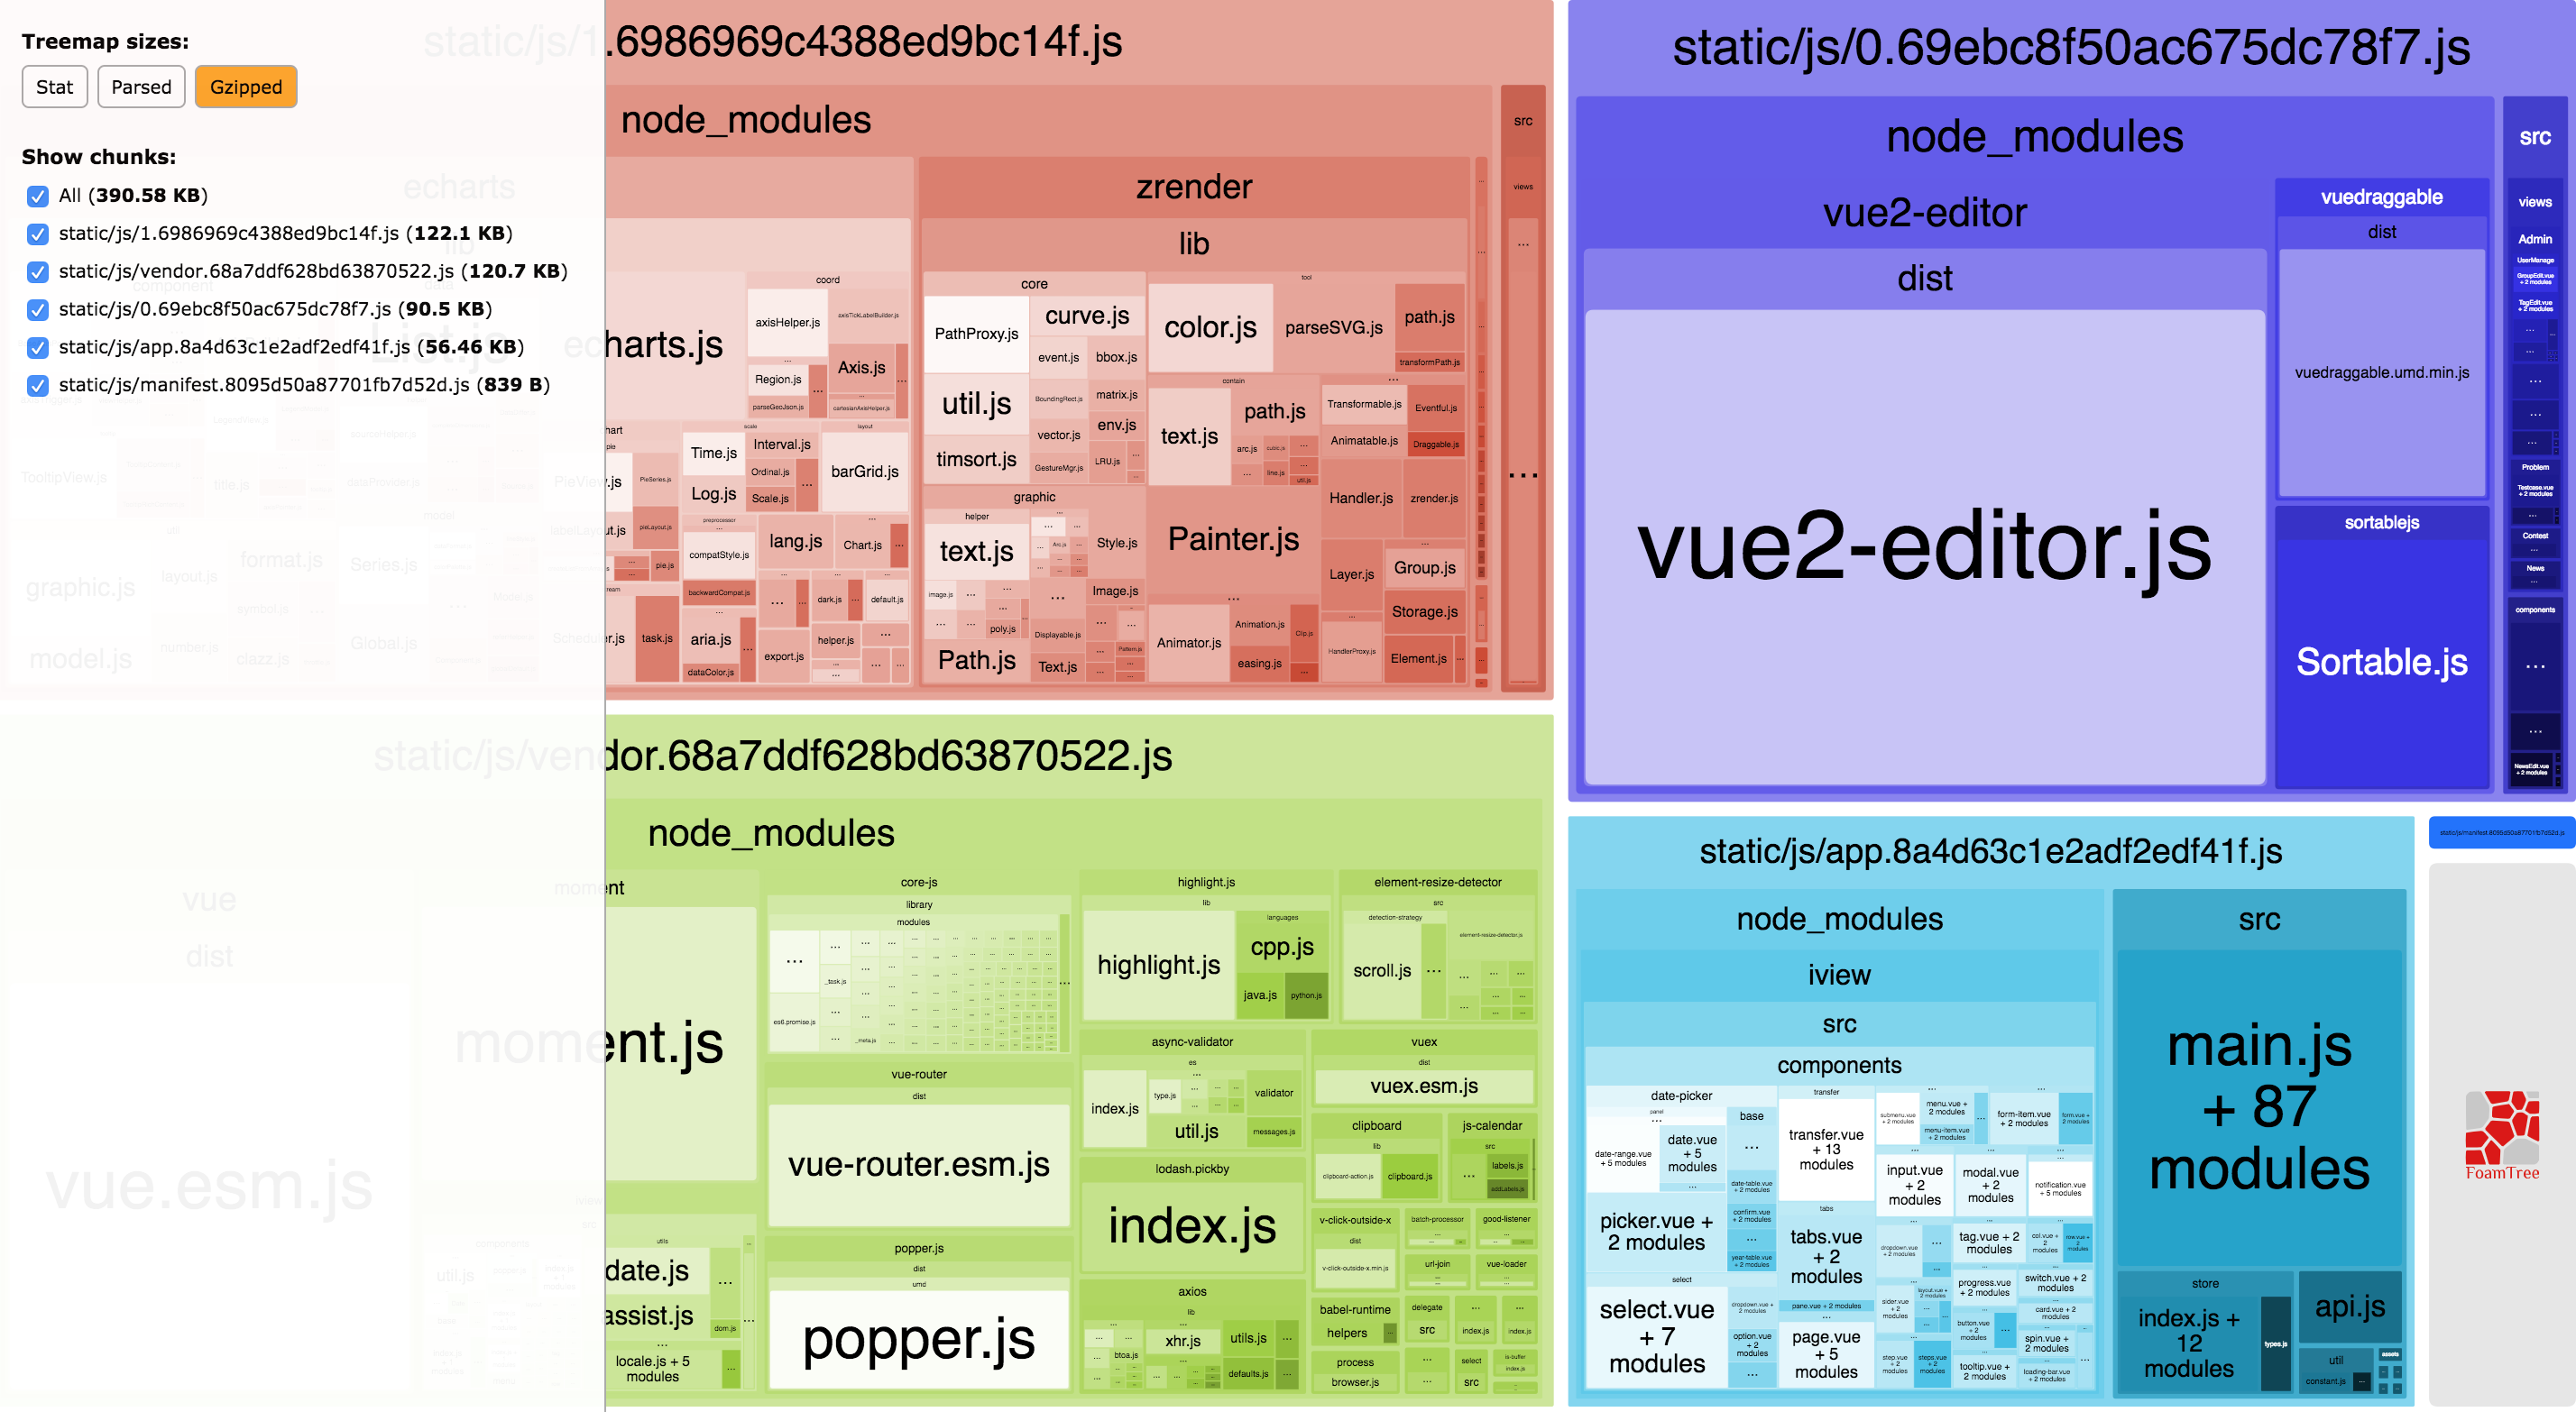
使用 webpack-bundle-analyzer 分析打包后的代码大小和内容
在 webpack 的配置文件加上以下内容1
2
3
4
5
6if (process.env.npm_config_report) {
const BundleAnalyzerPlugin = require('webpack-bundle-analyzer').BundleAnalyzerPlugin;
webpackBaseConfig.plugins.push(new BundleAnalyzerPlugin({
generateStatsFile: true,
}));
}
在 package.json 里的 scripts 作如下配置,可以手动改变 analyze 的环境1
2
3
4
5"scripts": {
"build": "NODE_ENV=dev node build/build.js",
"prod": "NODE_ENV=production node build/build.js",
"analyze": "npm_config_report=true npm run prod",
}

有些情况会看不到打包后 Parsed 和 Gzipped 模式的大小,需要在运行完 npm run analyze 命令之后,执行以下命令1
webpack-bundle-analyzer dist/stats.json
生成的文件上传到 analyse,可以分析打包后的文件,module 数量, chunk 数量以及依赖关系等等
其他优化
lodash 按需打包
lodash 的包特别大,当你只使用了它的某写函数,而将整个包打进去,会导致打进去很多无用的代码
使用子包
lodash 中的每个函数在 NPM 中都有一个单独的发布模块
如果你只需要使用 cloneDeep 方法, 那么只需安装 lodash.cloneDeep 模块,然后引入1
2const cloneDeep = require(lodash.cloneDeep)
const copyObj = cloneDeep(obj)
但是其实这不是一个很好的办法,我们可以看下 lodash 和 它子包的大小

可以发现,当你的用的函数稍微多一点之后,其实加起来的大小也会跟整个包的大小差不多,所以不推荐使用这种方法
使用插件
还是安装 lodash 整个包,但是需要配置
安装 babel-plugin-lodash 插件
在 bebel 的 plugin 里添加1
"plugins": ["lodash"]
安装 lodash-webpack-plugin 插件
在 webpack 作如下配置1
2
3
4
5
6
7
8
9
10
11const LodashModuleReplacementPlugin = require('lodash-webpack-plugin');
module.exports = {
mode: 'production',
...
plugins: [
new LodashModuleReplacementPlugin({
shorthands: true,
}),
]
}
这样最后打出来的 Gzipped 包只会有几 KB 的大小
升级babel7
使用了babel7.0以上的版本,依赖不再是安装 babel-core 这种,命名空间改为了 @babel-core
所有原来的依赖都要更改为新的命名空间1
2"@babel/core": "^7.1.2",
"@babel/preset-env": "^7.1.5",
如果是在已有项目对 babel6 进行升级的话,就不需要一个个包去重新安装,使用以下命令即可
babel 升级工具修改配置1
2
3
4
5npx babel-upgrade --write
# 或是安装 babel-upgrade -g
npm install babel-upgrade -g
babel-upgrade --write
Tree Shaking 优化
为了让 Tree Shaking 对第三方 npm 包生效,需要通过 mainFields 配置模块的入口描述1
2
3
4
5
6module.exports = {
resolve: {
// 针对 Npm 中的第三方模块优先采用 jsnext:main 中指向的 ES6 模块化语法的文件
mainFields: ['jsnext:main', 'browser', 'main']
}
}
以上配置的含义是优先使用 jsnext:main 作为入口,如果不存在 jsnext:main 就采用 browser 或者 main 作为入口。 虽然并不是每个 Npm 中的第三方模块都会提供 ES6 模块化语法的代码,但对于提供了的不能放过,能优化的就优化。
排查报错信息
有时候打包是成功的,但是代码运行有问题,这时候我们需要在打包后的代码里排查问题
为了识别哪块代码属于哪一个模块,可以通过设置 pathinfo 打印出来1
2
3
4
5
6
7// webpack.config.js
module.exports = {
//...
output: {
pathinfo: true
}
};