想要了解 javascript 的原型链和继承,就要先从 javascript 的对象说起,如何创建一个 javascript 对象
创建对象(ES5)
虽然 Object 构造函数或对象字面量都可以用来创建单个对象,但这些方式有个明显的缺点:使用同一个接口创建很多对象,会产生大量的重复代码。为解决这个问题,人们开始使用工厂模式这一变体。
1.工厂模式
用函数来封装一特定接口创建对象的细节,如下面的例子所示1
2
3
4
5
6
7
8
9
10
11function Person (name, age) {
let o = new Object()
o.name = name
o.sayName = function () {
console.log(this.name)
}
return o
}
let p1 = Person('Nicho', 29)
let p2 = Person('Greg', 27)
可以通过 Person 函数构建含有必要信息的 Person 对象。工厂模式虽然解决了创建多个相似对象的问题,但却没有解决对象识别的问题(即怎样知道一个对象的类型)
2.构造函数模式
可以创建自定义的构造函数,从而自定义对象类型的属性和方法,通过构造函数模式将上面的例子重写1
2
3
4
5
6
7
8
9
10function Person (name, age) {
this.name = name
this.age = age
this.sayName = function () {
console.log(this.name)
}
}
let p1 = new Person('Nicho', 29)
let p2 = new Person('Greg', 27)
构造函数虽然好用,在之前 p1 和 p2 都有一个名为 sayName() 的方法,但这两个方法不是同一个 Function 的实例。ECMAScript中的函数是对象,因此每定义一个函数,也就是实例化了一个对象。以下代码可以证明不同实例上的同名函数是不相等的。1
console.log(p1.sayName === p2.sayName) // false
3.原型模式
我们创建的每个函数都有一个 prototype (原型)属性,这个属性是一个指针,指向一个对象。prototype 就是通过调用构造函数而创建的那个对象实例的原型对象。使用原型对象的好处是可以让所有对象实例共享它所包含的属性和方法,换句话说,不必在构造函数中定义对象实例的信息,而是可以将这些信息直接添加到原型对象中,如下:1
2
3
4
5
6
7
8
9
10
11
12
13
14
15function Person () {
Person.prototype.name = 'Nicho'
Person.prototype.age = 29
Person.prototype.sayName = function () {
console.log(this.name)
}
}
let p1 = new Person()
p1.sayName() // 'Nicho'
let p2 = new Person()
p2.sayName() // 'Nicho'
console.log(p1.sayName === p2.sayName) // true
4.组合使用构造函数模式和原型模式
创建自定义类型的最常见方式,就是组合使用构造函数模式和原型模式。构造函数模式用于定义实例属性,而原型模式用于定义方法和共享的属性。结果,每个实例都会有自己的一份实例属性的副本,但同时又共享着对方法的引用,最大限度地节省了内存。另外,这种混合模式还支持向构造函数传递参数1
2
3
4
5
6
7
8
9
10
11
12
13
14
15
16
17
18
19
20
21function Person (name, age) {
this.name = name
this.age = age
this.friends = ['Shelby', 'Court']
}
Person.prototype = {
constructor: Person,
sayName: function () {
console.log(this.name)
}
}
let p1 = new Person('Nicho', 29)
let p2 = new Person('Greg', 27)
p1.friends.push('Van')
console.log(p1.frinends) // [ 'Shelby', 'Court', 'Van' ]
console.log(p2.frinends) // [ 'Shelby', 'Court' ]
console.log(p1.frinends === p2.friends) // false
console.log(p1.sayName === p2.sayName) // true
其实在原型对象 Person 中,Person 作为构造函数有一个 prototype 属性指向原型对象Person.prototype,而原型对象 Person.prototype 也有一个 constructor 属性指向它的构造函数 Person,如下图所示: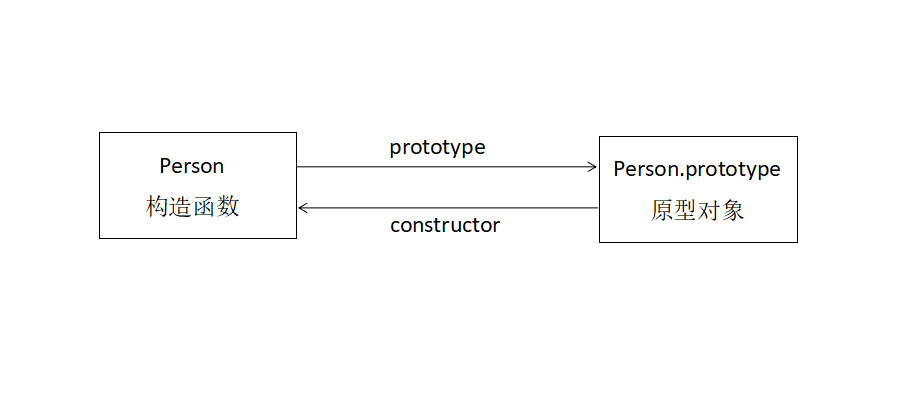
这种构造函数与原型混成额模式,是目前在ECMAScript中使用最广泛、认同度最高的一种创建自定义类型的方法。
5.动态原型模式
有其他OO语言开发经验的开发者在看到独立的构造函数和原型时,可能会感到困惑。动态原型模式把所有信息都封装在了构造函数中,而通过在构造函数中初始化原型(仅在必要的情况下),又保持了同时使用构造函数和原型的优点。换句话说,可以通过某个应该存在的方法是否有效,来决定是否需要初始化原型。1
2
3
4
5
6
7
8
9
10
11
12
13function Person (name, age) {
this.name = name
this.age = age
// 方法
if (typeof this.sayName !== 'function') {
Person.prototype.sayName = function () {
console.log(this.name)
}
}
}
let friend = new Person('Nicho', 29)
friend.sayName() // 'Nicho'
上面注释的方法部分,只有在 sayName 方法不存在的情况下,才会将它添加到原型中。这段代码只会在初次调用构造函数时才会执行,此后,原型已经完成初始化,不需要在做什么修改了。
6.寄生构造函数模式
通常在前述的几种模式都不适用的情况下,可以使用寄生构造函数模式。这种模式的基本思想是创建一个函数,该函数的作用仅仅是封装创建对象的代码,然后再返回新创建的对象,从表面上看,这个函数又很像是典型的构造函数。1
2
3
4
5
6
7
8
9
10
11
12function Person (name, age) {
let o = new Object()
o.name = name
o.age = age
o.sayName = function () {
console.log(this.name)
}
return o
}
let friend = new Person('Nicho', 29)
friend.sayName() // 'Nicho'
与工厂模式相比,就是使用了 new 操作符并把使用的包装函数叫做构造函数。
继承(ES5)
可以让某个类型的对象获得另一个类型的对象的属性和方法称为继承
许多OO语言都支持两种继承方式:接口继承和实现继承。接口继承只继承方法签名,而实现继承则继承实际的方法。由于函数没有签名,在ECMAScript中无法实现接口继承。ECMAScript只支持实现继承,而且其实现继承主要是依靠原型链来实现的
1.原型链
1 | function SuperType () { |
原型链的缺点在于继承得到的类的所有实例都会共享一个父类的属性,只要有一个实例的继承下来的属性发生变化,其他实例也会发生变化。还有在创建子类型的实例时,不能向超类型的构造函数传递参数。实践中很少会单独使用原型链。
2.借用构造函数 – 使用call和apply方法实现继承
使用 call 和 apply 比较方便,因为只需要一行代码就可以实现继承。但是该方法也有其局限性,call 和 apply 不能继承原型上的属性和方法
使用call实现继承
1 | // 父类构造函数 |
需要注意的是, call 和 apply 只能继承本地属性和方法, 而不能继承原型上的属性和方法,如下面的代码所示, 我们给 Student 挂载 study 方法,Pupil 使用 call 继承 Student 后, 调用 pupil2.study() 会报错:1
2
3
4
5
6
7
8
9
10
11
12
13
14
15
16
17
18
19
20
21
22// 父类构造函数
function Student (name, age, subject) {
this.name = name
this.age = age
this.subject = subject
}
// 原型上挂载study方法
Student.prototype.study = function () {
console.log('我在学习' + this.subject)
}
// 子类构造函数
function Pupil (name, age, subject, school) {
// 使用call实现继承
Student.call(this, name, age, subject)
this.school = school
}
let pupil2 = new Pupil('小辉', 8, '小学义务教育课程', '北大附小')
// 报错
pupil2.study() // Uncaught TypeError: pupil2.study is not a function
使用apply实现继承
使用 apply 实现继承的方式和 call 类似, 唯一的不同只是参数需要使用数组的方法。下面我们使用 apply 来实现上面 Pupil 继承 Student 的例子。1
2
3
4
5
6
7
8
9
10
11
12
13
14
15
16// 父类构造函数
function Student (name, age, subject) {
this.name = name
this.age = age
this.subject = subject
}
// 子类构造函数
function Pupil (name, age, subject, school) {
// 使用applay实现继承
Student.apply(this, [name, age, subject])
this.school = school
}
// 实例化Pupil
let pupil2 = new Pupil('小辉', 8, '小学义务教育课程', '北大附小')
3.组合继承
组合继承是将原型链和借用构造函数组合在一块的一种继承模式,思路是借用原型链实现对原型属性和方法的继承,而通过借用构造函数来实现对实例属性的继承。这样,既通过原型上定义方法实现了函数的复用,有能够保证每个实例都有它自己的属性。1
2
3
4
5
6
7
8
9
10
11
12
13
14
15
16
17
18
19
20
21
22
23
24
25
26
27
28
29
30
31
32function Student (name) {
this.name = name
this.colors = ['red', 'blue', 'green']
}
Student.prototype.sayName = function () {
console.log(this.name)
}
function Pupil (name, age) {
// 继承属性
Student.call(this, name)
this.age = age
}
// 继承方法
Pupil.prototype = new Student()
Pupil.prototype.constuctor = Pupil
Pupil.prototype.sayAge = function () {
console.log(this.age)
}
let p1 = new Pupil('Nicol', 29)
p1.colors.push('black')
console.log(p1.colors) // [ 'red', 'blue', 'green', 'black' ]
p1.sayName() // Nicol
p1.sayAge() // 29
let p2 = new Pupil('Greg', 27)
console.log(p2.colors) // [ 'red', 'blue', 'green' ]
p2.sayName() // Greg
p2.sayAge() // 27
组合继承避免了原型链和借用构造函数的缺陷,融合了它们的优点,称为 Javascript 中最常用的继承模式。
4.原型式继承
先来看一下 Object.create() 的实现方式1
2
3
4
5function object (o) {
let F = function () {}
F.prototype = o
return new F()
}
在object函数内部,先创建一个临时性的构造函数,然后将传入的对象作为这个构造函数的原型,最后返回了这个临时类型的一个新实例。ES5新增 Object.create() 方法规范了原型式继承。这个方法接收两个参数:一个用作新对象原型的对象和(可选的)一个作为新对象定义额外属性的对象。1
2
3
4
5
6
7
8
9
10
11
12
13
14
15
16
17
18let person = {
name: 'Nicho',
friends: ['Shelby', 'Court', 'Van']
}
let p1 = Object.create(person)
p1.name = 'Greg'
p1.friends.push('Rob')
let p2 = Object.create(person)
p2.name = 'Linda'
p2.friends.push('Barbie')
console.log(p1.name) // Greg
console.log(p2.name) // Rob
console.log(p1.friends) // [ 'Shelby', 'Court', 'Van', 'Rob', 'Barbie' ]
console.log(p2.friends) // [ 'Shelby', 'Court', 'Van', 'Rob', 'Barbie' ]
console.log(person.friends) // [ 'Shelby', 'Court', 'Van', 'Rob', 'Barbie' ]
只想让一个对象与另一个对象保持类似的情况下,原型式继承是完全胜任的,不过包含引用类型值的属性时钟都会共享相应的值,就像使用原型模式一样。
5.寄生式继承
寄生式继承的思路与寄生构造函数和工厂模式类似,即创建一个仅用于封装继承过程的函数,该函数在内部以某种方式来增强对象,最后再像真地是它做了所有工作一样返回对象。1
2
3
4
5
6
7
8
9
10
11
12
13
14
15function create (original) {
let clone = Object.create(original)
clone.sayHi = function () {
console.log('hi')
}
return clone
}
let person = {
name: 'Nicho',
friends: ['Shelby', 'Court', 'Van']
}
let p1 = create(person)
p1.sayHi()
6.寄生组合式继承
尽管组合继承是 Javascript 最常用的继承模式,但是它最大的问题就是无论什么情况下,都会调用两次超类型构造函数,子类型最终会包含超类型对象的全部实例属性,但我们不得不在调用子类函数时重写这些属性。
所谓寄生组合式继承,即通过借用构造函数来继承属性,通过原型链的混成形式来继承方法。本质上,就是使用寄生式继承来继承超类型的原型,然后再将结果指定给子类型的原型。1
2
3
4
5
6
7
8
9
10
11
12
13
14
15
16
17
18
19
20
21
22
23
24
25
26
27
28
29function inheritPrototype (pupil, person) {
let prototype = Object.create(person.prototype) // 创建对象
prototype.constructor = pupil // 将prototype.constructor指向新生成对象的构造函数
pupil.prototype = prototype // 新生成对象的prototype指向父类的原型
}
function Person (name) {
this.name = name
this.colors = ['red', 'blue', 'green']
}
Person.prototype.sayName = function () {
console.log(this.name)
}
function Pupil (name, age) {
Person.call(this, name)
this.age = age
}
inheritPrototype(Pupil, Person)
Pupil.prototype.sayAge = function () {
console.log(this.age)
}
let p1 = new Pupil('Nicol', 27)
p1.sayName() // Nicol
p1.sayAge() // 27
以上例子的高效率体现在它只调用了一次Person构造函数,避免了在 Pupil.prototype 上面创建不必要的、多余的属性。与此同时,原型链还能保持不变,因此,还能够正常使用 instanceof 和 isPrototypeOf()。开发人员普遍认为寄生组合式继承是引用类型最理想的继承方式。
ES6中的面向对象
在讲完上面ES5繁琐的创建对象与继承之后,大家有没有觉得好复杂,其实我也是这种感觉,好在ES6提供了基于类 class 的语法。但 class 本质上是ES6提供的一颗语法糖,因为说到底,Javascript是一门基于原型的面向对象的语言。
ES6中对象的创建
1 | // 定义类 |
上面的代码定义了一个 Student 类, 可以看到里面有一个 constructor 方法, 这就是构造方法,而 this 关键字则代表实例对象。也就是说,ES5 中的构造函数 Student, 对应的是ES6中 Student 类中的 constructor 方法。
Student 类除了构造函数方法,还定义了一个 study 方法。需要特别注意的是,在ES6中定义类中的方法的时候,前面不需要加上 function 关键字,直接把函数定义进去就可以了。另外,方法之间不要用逗号分隔,加了会报错。而且,类中的方法全部是定义在原型上的,我们可以用下面的代码进行验证。1
2console.log(s1.__proto__.study === Student.prototype.study) // true
console.log(s1.hasOwnProperty('study')) // false
上面的第一行的代码中, student3.__proto__ 是指向的原型对象,其中 Student.prototype 也是指向的原型的对象,结果为 true 就能很好的说明上面的结论: 类中的方法全部是定义在原型上的。第二行代码是验证 s1 实例中是否有 study 方法,结果为 false, 表明实例中没有 study 方法,这也更好的说明了上面的结论。其实,只要理解了ES5中的构造函数对应的是类中的 constructor 方法,就能推断出上面的结论。
ES6中对象的继承
ES6中 class 可以通过 extends 关键字来实现继承, 这比前面提到的ES5中使用原型链来实现继承, 要清晰和方便很多。下面我们使用ES6的语法来实现 Pupil。1
2
3
4
5
6
7
8
9
10
11// 子类
class Pupil extends Student {
constructor (name, age, subject, school) {
// 调用父类的constructor
super(name, age, subject)
this.school = school
}
}
let pupil = new Pupil('小辉', 8, '小学义务教育课程', '北大附小')
pupil.study() // 我在学习小学义务教育课程
上面代码代码中, 我们通过了 extends 实现 Pupil 子类继承 Student 父类。需要特别注意的是,子类必须在 constructor 方法中首先调用 super 方法,否则实例化时会报错。这是因为子类没有自己的 this 对象, 而是继承父类的 this 对象,然后对其加工。如果不调用 super 方法,子类就得不到 this 对象。